Step by step guide on installing PowerPivot for SharePoint on a single machine
User Rating: 5 / 5

PowerPivot for SharePoint (RTM) installation on a single machine step by step guide
Note: CTP3 installation guide is further down.
This article assumes that you want to build PowerPivot for SharePoint environment on a single machine for demo or evaluation purpose. PowerPivot for SharePoint requires that your environment would have Active Directory configured as domain accounts are used for authentication because local machine accounts are not supported. If your demo environment already has domain setup, then you can skip few domain related steps.
Please do not use this guide if you are planning to have any real data on your computer. There is a security risk when you install SharePoint on the same machine as a Domain Controller (DC) and such setup is not recommended. Furthermore, this setups assumes that you will be using single administrator account to run SharePoint and SQL Services and such configuration should not be implemented in any real life scenario, except for software testing purposes.
So here are steps on how to setup PowerPivot for SharePoint 2010 on a single box (testing environment):
Part 1 - preparing your machine for installation
- Install new Windows 2008R2 or Windows 2008 Server SP2, 64bit machine and apply latest security patches.
- Check your machines name and if it is necessary rename it to your requirements.
- In the "Server Manager" click "Add Roles" and check "Active Directory Domain Services". Click "Next". After configuration completes, choose "Start"->"Run" and enter "dcpromo.exe". This will promote your machine to domain controller. Use fully qualified domain name, for example "vidas.local". During this you will be also asked to add DNS role to your machine. You will need to choose new domain administrator password during this step.You will need to restart your machine after this step.(skip this step if you have domain setup on another machine)
- In the "Server Manager" click "Add Features" and then select "Desktop Experience" feature. You will need this feature so you can work from server as workstation. You will need to restart your machine after setup of this feature completes.
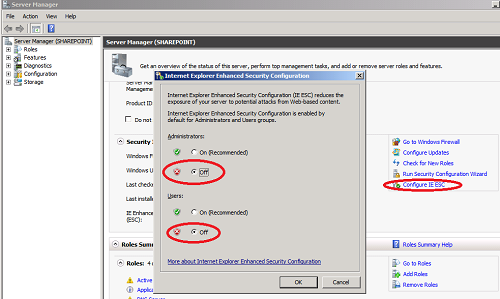
- In the "Server Manager" click "Configure IE ESC" to configure Internet Enhanced security. Choose "Off" for "Administrators" and "Users". When this feature is "ON", internet explorer asks you for permissions to access every website and you have to add every visited site to allowed site list. As you are building demo machine, this security setting is not necessary.
Part 2 - installing SharePoint
- Make sure that account you logon to do installation is a domain administrator. For simplicity reasons we will use that account for SharePoint and SQL Services.Again, this type of security is acceptable just for demo machines build and should not be used in any production environment.
- Start SharePoint setup
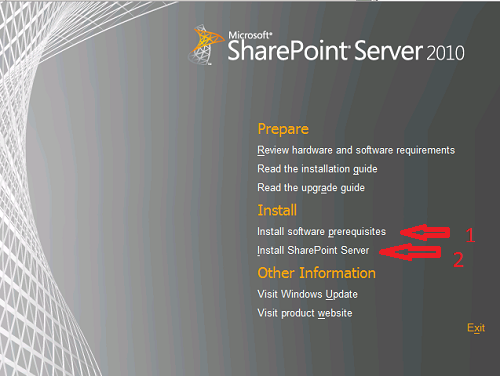
- Choose option "Install software Prerequisites". Make sure that setup finished successfully.
- Start SharePoint setup and choose option "Install SharePoint Server".
- In the first setup window enter product key.
- Accept licence agreement.
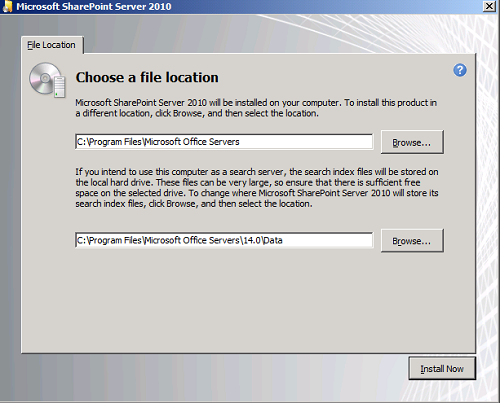
- Next screen will give you option to select SharePoint file location. You will not have an option to select installation type (like "server farm" or "Standalone") because you are running setup on a machine that is also a domain controller.
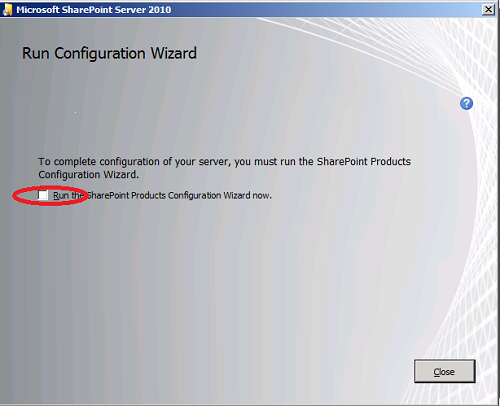
- After you will press "Install Now" button, SharePoint installation will begin. After installation completes, you will see window "Run configuration wizard". Un-check option "Run the SharePoint Products and Technologies Configuration Wizard now" and click close.
Part 3 - installing PowerPivot from Sharepoint
- Now it is time to configure SharePoint for PowerPivot. This is done using SQL Server 2008R2 setup (!).
- Start SQL Server 2008R2 setup. Choose "Installation" and then "New installation or add new features to and existing installation"
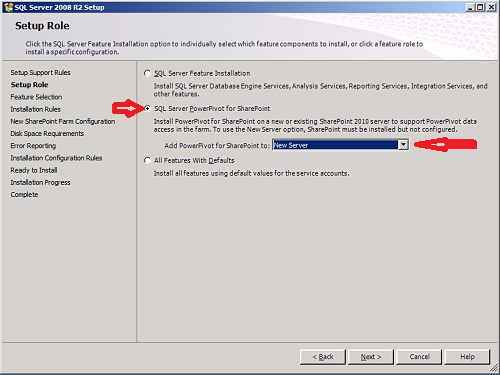
- Go through setup till you reach screen "Setup Role"
- In the "Setup Role" window choose "SQL Server PowerPivot for SharePoint" and for "Add PowerPivot forSharePoint to:" option choose "New server". Click Next
- Review and then click "Next" in the "Feature Selection" window.
- Review and then click "Next" in the "Installation Rules" window
- Review and then click "Next" in the "Instance Configuration" window
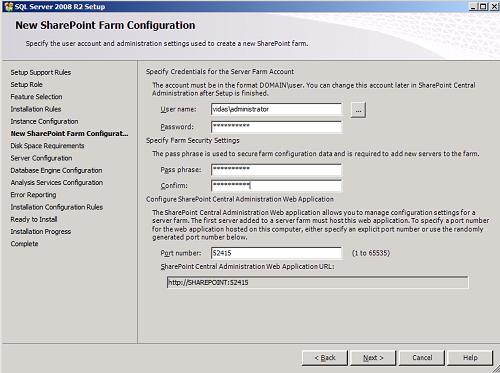
- In the "New SharePoint Farm Configuration" window specify
User name: <domain name>\<userName>. For simplicity you can use user account that is currently logged on, for example "vidas\administrator"
Password: <your password>
Pass phrase: <your pass phrase>
Confim: <your pass phrase>
Leave port number generated for you
- Review and then click "Next" in the "Disk Space Requirements" window
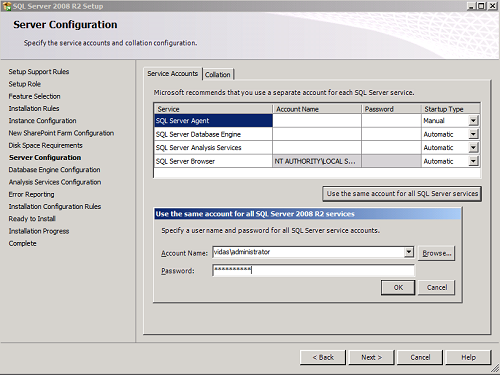
- In the "Server configuration" window specify accounts used to run Agent, SQL and SSAS services. You can use the same account that is currently logged on, for example "vidas\administrator". Click Next.
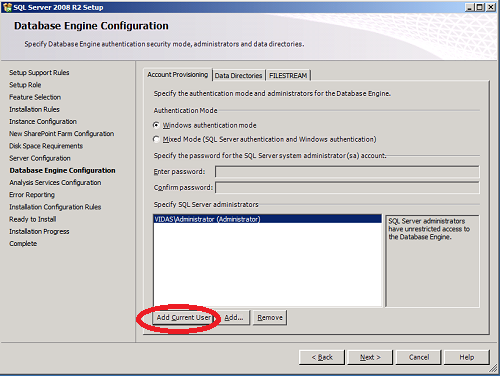
- In the "Database Engine Configuration" window add current user (click "Add Current User") and other users (as required, click "Add...") to the "SQL Server Administrators" list. Review "Data directories" tab. Click "Next".
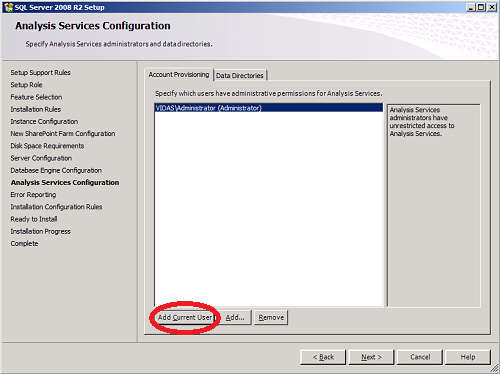
- In the "Analysis Services Configuration" window add current user (click "Add Current User") and other users (as required, click "Add...") to the "Analysis Administrators" list. Review "Data Directories" tab. Click "Next".
- Go through the rest of the setup steps and then setup will start. It might take 30-60min for setup to complete.
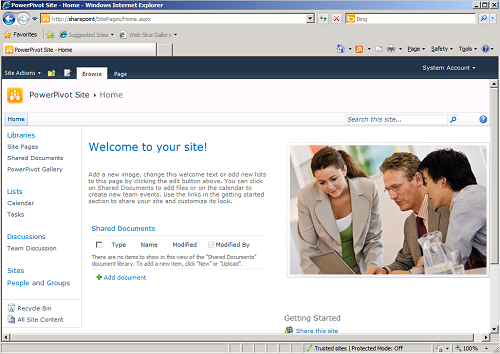
- After setup completes, test your SharePoint site. Start IE and enter url http://<YourServerName> (example: http://SharePoint). It might take few minutes (on a slowers machines even 5min) for SharePoint website to respond first time. You should see SharePoint site that looks similar to:
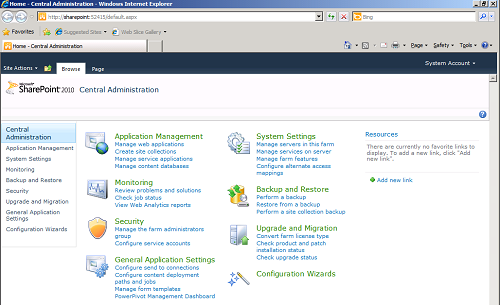
- Test your SharePoint "Central Administration" site. Click on "Start" then choose menu "All Programs"->"Microsoft SharePoint 2010 Products" and then "SharePoint 2010 central administration". You should see SharePoint site that looks similar to this picture:
- Create PowerPivot workbook and to test, save it on your SharePoint site.
- Review SharePoint logs in the folder [SystemDrive]:\Program Files\Common Files\Microsoft Shared\Web Server Extensions\14\LOGS\
- Installation is done.
At this point you should be done and your PowerPivot for SharePoint environment should be ready for your testing. Enjoy!
Additional resources:
- PowerPivot for Sharepoint setup guide by Dave Wickert (Microsoft)
- FAQ: SharePoint 2010 RTM Installation by Jim Li
- Quick start: Deploy single server in an isolated Hyper-V environment (SharePoint Server 2010)
- How to: Install PowerPivot Client and Server Software on a Single Computer
- Virtual machine guidance (SharePoint Server 2010)
- SharePoint 2010 documentation online
- Install a development Microsoft SharePoint 2010 RTM Server with PowerPivot and Microsoft SQL Server R2 Reporting Services integration
- Installing SharePoint 2010 and PowerPivot for SharePoint on Windows 7
If you found this article useful - please scroll to the top and rate it (option just below article title). Every rating is very much appreciated!
PowerPivot for SharePoint installation on a single machine - November CTP (CTP3)
As Microsoft just released Office 2010 beta, SharePoint 2010 server beta and PowerPivot for SharePoint, many of you will want to test this setup in your own environment. Here you will find step by step instructions on how to build such environment.
This article assumes that you want to build PowerPivot for SharePoint environment on a single machine for demo or evaluation purpose. PowerPivot for SharePoint requires that your environment would have Active Directory configured as domain accounts are used for authentication because local machine accounts are not supported. If your demo environment already has domain setup, then you can skip few domain related steps.
First of all I would like to point that Microsoft already has very good documentation on how to setup PowerPivot for SharePoint here. But that document describes multiple scenarios (farms, single or multiple machines, etc), so I decided describe what you need to do exactly to setup PowerPivot for SharePoint 2010 on a single box. I also included all fixes that you need to apply for November CTP (CTP3) installation.
So here are steps on how to setup PowerPivot for SharePoint 2010 on a single box (testing environment):
- Install new Windows 2008R2 or Windows 2008 Server SP2, 64bit machine and apply latest security patches.
- Add role "Active Directory Domain Services" and promote machine to domain controller using dcpromo.exe. During this you will be also asked to add DNS role to your machine. (skip this step if you have domain setup on another machine)
- In your active directory create following users:
SPAdmin - SharePoint administrator account
SQLService - domain accounts that will be used to run SQL Server/SSAS services
Note - you do not need to add these accounts to any groups. - Add Server feature "Desktop Experience" ("Server Manage"->"Features"->"Add Feature") so you can work from server as workstation.
- Make sure that account you logon to do installation is domain administrator.
- Start Sharepoint setup and choose option "Install software Prerequisites". Make sure that setup finished successfully. If you do not have connection to Internet, then you might need to download to your machine certain packages yourself. Here is info on how to do that.
Note: For CTP3 if you already have Power-Shell 1.0 installed on your machine, this step will fail during PowerShell V2 (CTP3) install. You have to manually uninstall PowerShell. For Windows 2008 you can do that from "Server Manage" - choose Features then "Remove Features" and then uncheck "Windows PowerShell". - Install WCF hot fix.
- for Windows 2008 and Vista:
http://support.microsoft.com/kb/971831 (this is the KB article)
http://code.msdn.microsoft.com/Project/Download/FileDownload.aspx?ProjectName=KB971831&DownloadId=7285 (this is the download) - For Windows 2008R2 and Windows 7
https://connect.microsoft.com/VisualStudio/Downloads/DownloadDetails.aspx?DownloadID=23806&wa=wsignin1.0
- for Windows 2008 and Vista:
- If you setup domain controller on the same machine that will run SharePoint, the following Windows PowerShell command would need to be run to enable Sandboxed Solutions.
Note: Script was written by Jie Li and copied from here.
$acl = Get-Acl HKLM:\System\CurrentControlSet\Control\ComputerName
$person = [System.Security.Principal.NTAccount]"Users"
$access = [System.Security.AccessControl.RegistryRights]::FullControl
$inheritance = [System.Security.AccessControl.InheritanceFlags]"ContainerInherit,ObjectInherit"
$propagation = [System.Security.AccessControl.PropagationFlags]::None
$type = [System.Security.AccessControl.AccessControlType]::Allow
$rule = New-Object System.Security.AccessControl.RegistryAccessRule($person, $access,$inheritance, $propagation, $type)
$acl.AddAccessRule($rule)
Set-Acl HKLM:\System\CurrentControlSet\Control\ComputerName $acl
Here are steps on how you can run this script:
copy script to file sp.ps1
in command line enter "PowerShell"
enter "Set-executionpolicy unrestricted" (without double quotes)
enter "C:\Scripts\sp.ps1" (without double quotes)
enter "Set-executionpolicy restricted" (without double quotes)
enter "Exit" (without double quotes)
- Start SharePoint setup.
Note: it is very important that you choose correct setup options, otherwise you will not be able to setup PowerPivot for SharePoint in the later steps. - In the "Choose the Installation you want" click on "Server Farm" button. It is important that you do not click on "Standalone" button, even when you are installing standalone SharePoint server (!)
- In the next window "Server type" choose option "Complete - Install all components. Can add servers to form a SharePoint farm".
- After you will press "Install Now" button, SharePoint installation will begin. After installation completes, you will see window "Run configuration wizard". Un-check option "Run the SharePoint Products and Technologies Configuration Wizard now" and click close.
- Now it is time to configure SharePoint for PowerPivot. This is done using SQL Server 2008R2 setup (!). You can download SQL Server 2008R2 November CTP here.
- Start SQL Server 2008R2 setup.
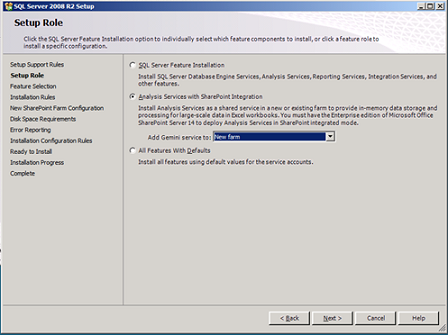
- In the "Setup Role" window choose "Analysis Services with SharePoint Integration" and for "Add Gemini service to:" option choose "New farm".
Picture 1
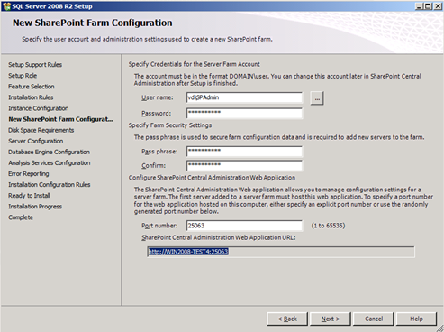
- In the "New SharePoint Farm Configuration" window specify
User name: <domain name>\SPAdmin (user created in previous step)
Password: <your password>
Pass phrase: <your pass phrase>
Confim: <your pass phrase>
Leave port number generated for you
Picture 2
- In the "Server configuration" \ "Specify the service accounts and collation configuration" window specify accounts used to run Agent, SQL and SSAS services. You can use for that domain accont "<domain>\SQLService" created in one of the previous step.
- In the "Database Engine Configuration" window add current user and other users (as required) to the "SQL Server Administrators" list.
- In the "Analysis Services Configuration" window add current user and other users (as required) to the "Analysis Administrators" list.
- Setup will start.
- If your domain controller is on another machine, then you are done and you do not need to follow steps below. Just wait for setup to finish.
- If you are running domain controller on the same machine, you are not done yet. It is very important that you monitor your setup, as you might have to do some tricks, to make it work!
- If you are running this on virtual machine (Hype-V), then I would recommend that you create your machine snapshot just before your setup will reach half way, in case you will need this recovery point.
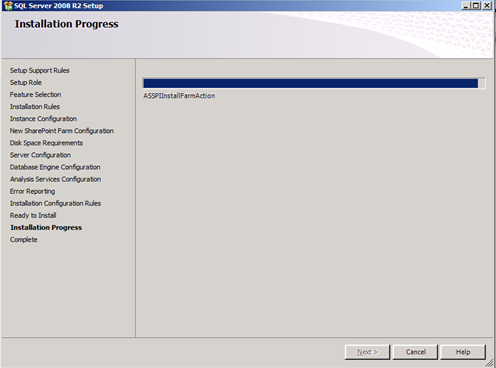
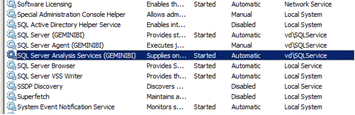
- There is a know issue when you install PowerPivot on domain controller described here. Basically in the middle of the setup your service "SQL Server Analysis Services (GeminiBI)" might change logon credentials from the domain account to "Local system account". You should prepare for that and change logon credentials back to domain account as described in the post above. Monitor your setup when it reaches approximately this point:
Picture 3
Then refresh service list every few seconds till you see that service account changed and reset it back
Picture 4
- After you changed service account restart service and let setup doe its job. After few minutes setup will finish.
- You can check your new SharePoint site that has integrated PowerPivot by typing in your server name in Internet Explorer:
Picture 5

- Installation is done.
Added Nov 25, 2009
After installation try to create and deploy PowerPivot to SharePoint. Check if during interaction with published PowerPivot you are getting error message:
"Excel Web Access"
An error occurred during an attempt to establish a connection to the external data source. The following connections failed to refresh:
Sandbox
If you are getting error message above, then add your SharePoint administrator account (in our case account is <domain>\SPAdmin) to the active directory user group "Domain Admins" and restart your machine.
Added Nov 27, 2009 - Big thanks to Russell Christopher for this tip!
You might encounter issue, when you deploy PowerPivot report to PowerPivot gallery, you might see that gallery preview is not generated. When you hover over report in the gallery, you might notice following error: "An Error Occued while Capturing Snapshots for this Document".
Also, if you review [SystemDrive]:\Program Files\Common Files\Microsoft Shared\Web Server Extensions\14\LOGS\gemini.log file, you might notice following error text:
11/26/2009 8:08:37 PM : VidasPPTest-2.xlsx - is Added in PowerPivot Gallery located at http://win2008r2-test1 by VD\administrator . .
11/26/2009 8:08:38 PM : VidasPPTest-2.xlsx - Refresh/Update loop succeeded! (vti_Snapshots) .
11/26/2009 8:08:39 PM : VidasPPTest-2.xlsx - is Updated in PowerPivot Gallery located at http://win2008r2-test1 by VD\administrator . .
11/26/2009 8:08:39 PM : VidasPPTest-2.xlsx - Pending operation detected .
11/26/2009 8:13:36 PM : VidasPPTest-2.xlsx - SUCCESS: GetSnapshot self-terminated (after 298.3935967 seconds) .
11/26/2009 8:13:36 PM : VidasPPTest-2.xlsx - Parsing .info file (C:\Windows\TEMP\50035e2b_9a62_483f_83c6_8f3e992f5272.info) .
11/26/2009 8:13:36 PM : VidasPPTest-2.xlsx - INFO: 'http://win2008r2-test1:80' was found in a different trust zone (URLZONE_INTERNET). Attempting to remove from URLZONE_INTERNET. .
11/26/2009 8:13:36 PM : VidasPPTest-2.xlsx - INFO: 'http://win2008r2-test1:80' was removed from (URLZONE_INTERNET) .
11/26/2009 8:13:36 PM : VidasPPTest-2.xlsx - INFO: 'http://win2008r2-test1:80' cannot be added to the list of trusted intranet sites: -2147024890 .
11/26/2009 8:13:36 PM : ERROR: VidasPPTest-2.xlsx - INFO: System.TimeoutException: The operation has timed out. .
11/26/2009 8:13:36 PM : VidasPPTest-2.xlsx - Snapshots:(0) .
11/26/2009 8:13:36 PM : VidasPPTest-2.xlsx - Refresh/Update loop succeeded! (vti_Snapshots) .
11/26/2009 8:13:37 PM : VidasPPTest-2.xlsx - is Lazily refreshed in PowerPivot Gallery located at http://win2008r2-test1 by VD\administrator . .
11/26/2009 8:13:37 PM : VidasPPTest-2.xlsx - Refresh/Update loop succeeded! (vti_RGTrigger) .
11/26/2009 8:13:37 PM : VidasPPTest-2.xlsx - is Updated in PowerPivot Gallery located at http://win2008r2-test1 by VD\administrator . .
11/26/2009 8:13:37 PM : VidasPPTest-2.xlsx - Refresh/Update loop succeeded! (vti_Snapshots) .
If you encountering this issue, you have to follow these steps:
- Log off from your SharePoint machine
- Login to your SharePoint machine with the SharePoint admin account. In our guide we used account <domain name>\SPAdmin
- Start Internet Explorer and add your SharePoint website to the trusted website list.
- Restart your machine
- Login back to your machine with regular account and try to deploy another report to PowerPivot gallery. Now you should see new report in PowerPivot gallery preview.
Added Nov 28, 2009 - Big thanks to Mariano Teixeira Neto (Microsoft) for this fix!
After all this setup you might still experience issues with data refresh. Check your SharePoint log to see if you can find following reported error logged every minute:
EXCEPTION: System.UnauthorizedAccessException: Access to the port is denied. at System.IO.Ports.InternalResources.WinIOError(Int32 errorCode, String str) at System.Threading.Semaphore.OpenExisting(String name, SemaphoreRights rights) at Microsoft.AnalysisServices.SharePoint.Integration.DataRefreshService.Execute() 4f7eb9c8-186a-4496-a76a-93af1d275504
Also, if you will try to schedule report refresh, you will not see any errors, but your report will not be refreshed.
To fix this data refresh issue you need to addSharePoint addministrator account (in our case <domain>\SPAdmin to the user group SQLServerMSASUser$MACHINENAME$DBINSTANCE. After that restart your machine and you can schedule your PowerPivot workbook data refresh.
At this point you should be done and your PowerPivot for SharePoint environment should be ready for your testing. Enjoy!
Additional resources:
- Single server install steps by Dave Wickert (Microsoft)
- Existing farm install steps by Dave Wickert (Microsoft)
- Server installation reported problems
- Troubleshooting PowerPivot/SharePoint Setup
- SharePoint 2010 beta error: Retrieving the COM class factory for component with CLSID {BDEADF26-C265-11D0-BCED-00A0C90AB50F} failed due to the following error: 800703fa (Kasper de Jonge)
If you found this article useful - please scroll to the top and rate it (option just below article title). Every rating is very much appreciated!
Tags: setup, sharepoint, paper, excel