Step by Step guide for creating demo PowerPivot workbook from AdventureWorksDW SQL tables
User Rating: 4 / 5


Introduction
This article is a step by step guide on how to create PowerPivot workbook from AdventureWorks DW database that Microsoft ships with SQL Server 2008 R2. I will use this workbook later as a starting point for posts about DAX functions. At the end of this post there is a link to download this workbook in a zipped format.
Notes
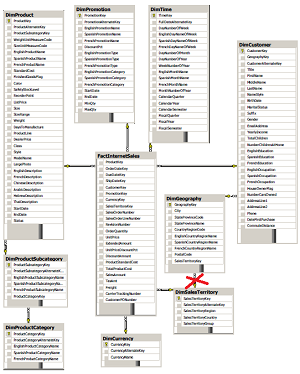
Note1: This guide assumes that you have access to SQL Server 2008R2 with AdventureWorksDW database installed from here. Into this PowerPivot sample we will be loading just fact table "FactInternetSales" and related dimension tables. Table structure relationships can be reviewed here (click on the picture for PDF document):
Note2: This guide assumes that you already installed PowerPivot for Excel.
Creating PowerPivot for Excel demo Workbook steps
- Start Microsoft Excel 2010
- Go to "PowerPivot" menu and click on "PowerPivot Window" button
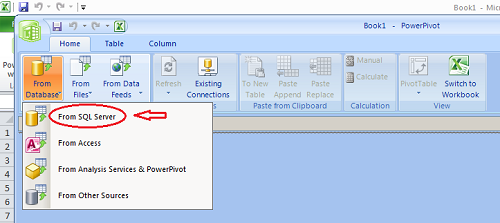
- In the "PowerPivot" window choose "From Database" and then "From SQL Server"
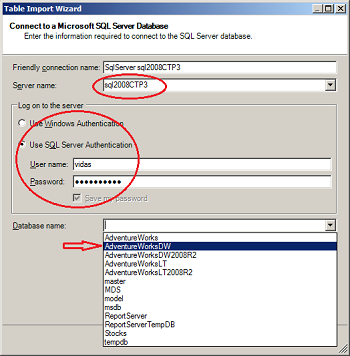
- In the "Tables Import Wizard" window enter necessary information to connect to your SQL Server and from drop down list select "Adventure Works DW" database.In my case I used "SQL Server Authentication", but if you have SQL Server in the domain or on the local machine, you are probably going to use "Windows authentication". After entering your connection information click "Next"
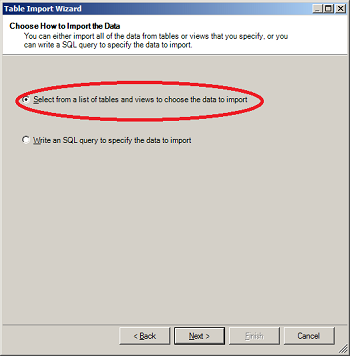
- In the next window you will be able to choose "How to import data". Options are "Select from a list of tables and views to choose the data to import" or "Write an SQL Query to specify the data to import". For our test environment we choose first option. Click "Next"
- In the next window you will be able to select tables and views that you would like to load into PowerPivot. You should select following tables: "DimCurrency", "DimCustomer", "DimGeography", "DimProduct", "DimProductCategory", "DimProductSubcategory", "DimPromotion", "DimSalesTerritory", "DimTime" and "FactInternetSales":
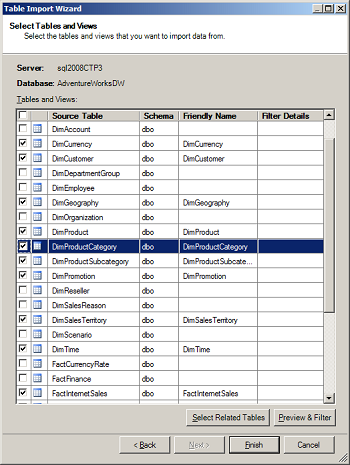
Note - that after you selected table, you can also click on "Preview & Filter" table to include just columns that you need for your analysis.
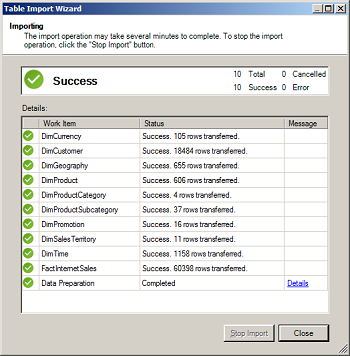
- After you will click "Finish" button, importing will start and after few moments you will see following screen:
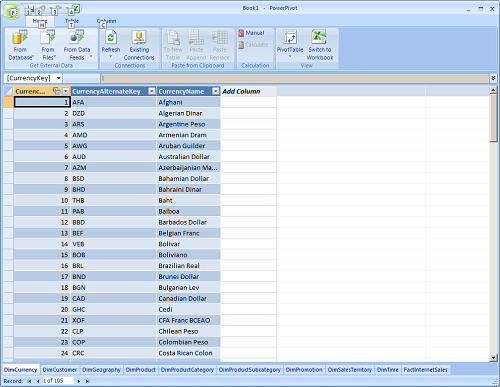
- After closing this importing wizard you will see imported tables in the PowerPivot environment. At the bottom of the workbook you will see list of tabs that represent tables and inside each tab you will see data from that table.
- Always review relationships that were automatically created for you. In our case SQL Server tables had foreign keys defined between them, so PowerPivot was able to use that information and automatically create correct relationships. But there is one thing that we would like to change. Table DimSalesTerritory had relationship to FactInternetSales table and to DimGeography table. But PowerPivot has limitation - each table can participate just once in the relationship as "Related Lookup Table". Because of that limitation PowerPivot choose to relate DimSalesTerritory table to DimGeography table. But for our example we would like to create a relationship between FactInternetSales table and DimSalesTerritory table.
- To review existing relationship choose "Table" menu item and then click on the button "Manage Relationships":
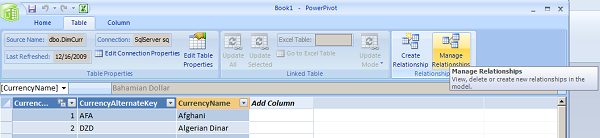
- New window will pop up that will show you existing relationships between tables.
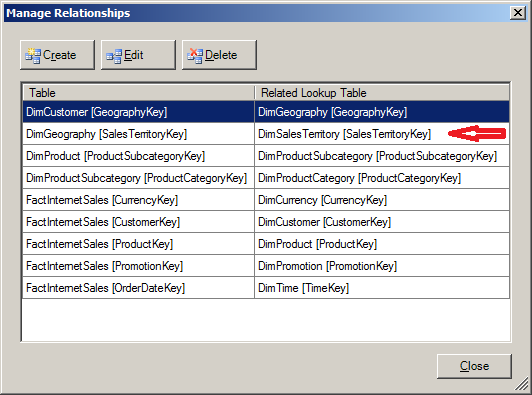
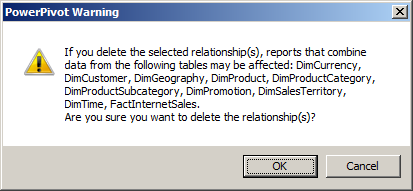
- As I said before, we would like to remove relationship betwen "DimGeography" and "DimSalesTerritory" and instead create relationship between "FactInternetSales" and "DimSalesTerritory". For that select relationship line "DimGeography[SalesTerritoryKey] DimSalesTerritory[SalesTerritoryKey]" and hit "Delete" button. You will get warning "If you delete the selected relationship(s), reports that combine data from the following tables may be affected:DimCurrency, DimCustomer, DimGeography, DimProduct, DimProductCategory, DimProductSubcategory, DimPromotion, DimSalesTerritory, DimTime, FactInternetSales.Are you sure you want to delete the relationship(s)?" After you select "OK" this relationship will be deleted.
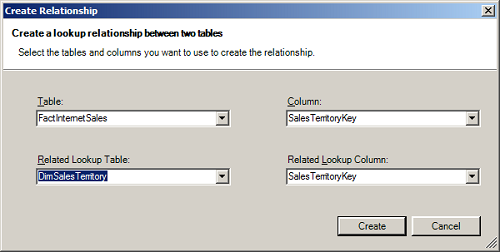
- To create new relationship select "Create" button. For Table select "FactInternetSales" and for column select "SalesTerritoryKey". For "Related Lookup Table" select "DimSalesTerritory" and for "Related Lookup Column" select "SalesTerritoryKey". Then click on "Create" button and new relationship will be created.
- Now you can close "Manage Relationships" window.
- Save existing Excel file with PowerPivot data to file AdventureWorksDW.xlsx
- Now we can hide all numeric Key columns from pivot as they are used just for relationships, but will not be used in any pivot queries.To hide column first select it, then right mouse click and choose menu "Hide Columns..." then choose option "From Pivot Table". This option will let you see column in PowerPivot window, but it will hide it from Pivot window.
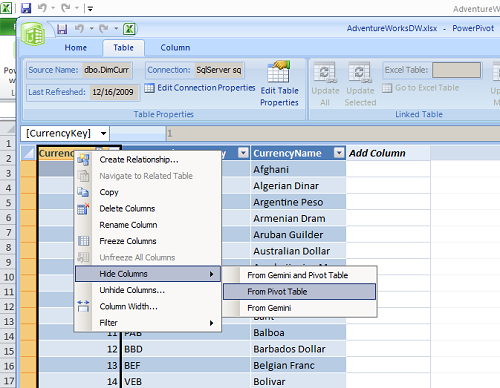
- We will hide following columns:
- Table "DimCurrency" column "CurrencyKey"
- Table "DimCustomer" columns "CustomerKey", "GeographyKey"
- Table "DimGeography" column "GeographyKey"
- Table "DimProduct" columns "ProductKey", "ProductSubcategoryKey"
- Table "DimProductCategory" columns" ProductCategoryKey", "ProductCategoryAlternateKey"
- Table "DimProductSubcategory" column "ProductSubcategoryKey", "ProductSubcategoryAlternateKey"
- Table "DimPromotion" columns "PromotionKey" and "PromotionAlternateKey"
- Table "DimSalesTerritory" columns "SalesTerritoryKey", "SalesTerritoryAlternateKey"
- Table "DimTime" column "TimeKey"
- Table "FactInternetSales" columns"ProductKey", "OrderDateKey", "DueDateKey", "ShipDateKey", "CustomerKey", "PromotionKey", "CurrencyKey", "SalesTerritoryKey"
- To finish our test we will create simple Pivot report from PowerPivot data we just loaded. For that in PowerPivot window select "PivotTable" menu and then choose "Single PivotTable".
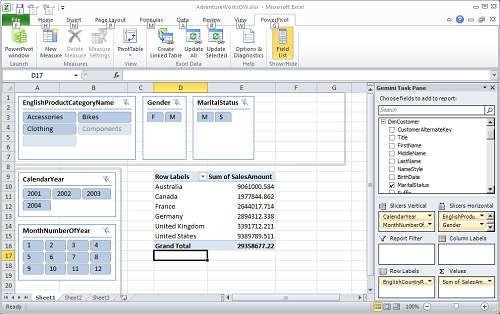
- Save your PowerPivot workbook again and then make a copy of that file in case your workbook will get corrupted during tests.
Now we have a workbook that we can use to test PowerPivot DAX functions. You can also download this workbook from here (size: 3MB)
Summary
We just created our PowerPivot workbook with data from multiple SQL Server tables. We also create Pivot report that was using data from different tables. This workbook will be used in other posts about DAX functions.
Next: How to add DAC calculations to the PowerPivot workbooks
Tags: introduction, dax, load, excel